Trigger Action - Send Email
It's useful to notify your customers automatically by sending an email as part of a trigger action. Remember that the autoresponder feature can be used to set up an automatic thank you page and email after a form submission.
If you plan to include a PDF as an attachment with the email, you need to create it first using the PDF tools.
- On the Trigger Actions panel, click "Add New Trigger Action". Depending on your starting point, you may need to select a profile, click "Edit Trigger Profile", and then click the Actions tab.
- Click "Send Email Action" and click Next.
-
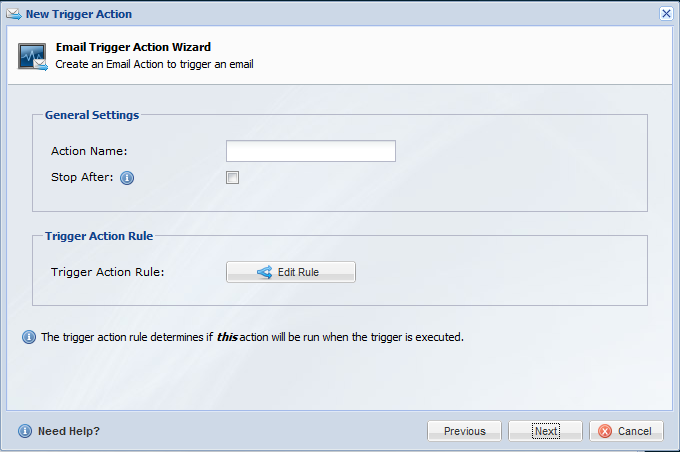
Note the description of this trigger and click Next. The "Email Trigger Action Wizard" appears.

- In the Action Name field, enter a descriptive name for this action.
- If you want to stop all other trigger actions after this profile runs -- if this is the last action you plan to run -- check Stop After.
- Click Edit Rule and use the standard Logiforms Rule screen to select one or more fields and define the settings that determine when this action will be run.
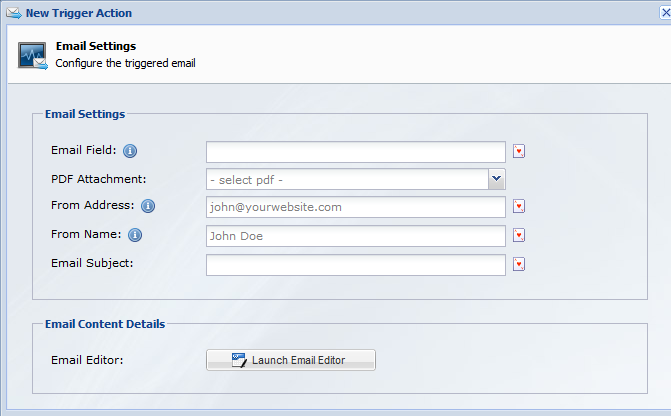
- Click Next. The standard Email Settings window appears.

- In the Email field, click the wildcard icon to choose the field that holds the email address of the recipient. Or, depending on your business requirements, you can enter a specific email address for all emails.
- If you have created a PDF, you can attach it to this email. If you have not yet done so, you can always come back and edit this action and add the attachment.
- In the From Address field, enter the address that you want your customer to see as the sending email address. Or, depending on your business requirements, you can click the wildcard icon and select a field.
- In the From Name field, enter the name of the sender that you want your customer to see in this email. Or you can click the wildcard icon and select a field.
- In the Email Subject field, enter the subject line that you want your customer to see. You can personalize it by clicking the wildcard icon and entering one or more fields. For example, you can add the customer name or the name of the product or service they purchased.
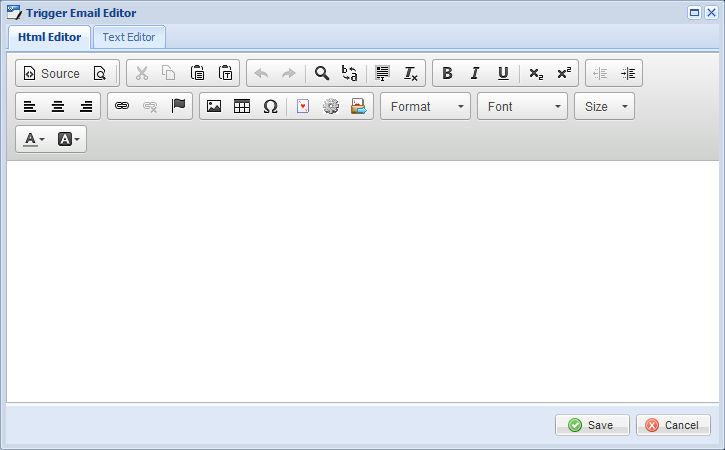
- Click Launch Email Editor. <need link to one topic that covers all the buttons Rich Text Editor with more>

- Create your email message and click Save.
- Click Finish. The Trigger Actions panel appears with the name of this action listed.
Next Steps
Click Finish to return to the Trigger Profiles panel or click "Add New Trigger Action" to add another action to this profile.
If you need to edit or delete a trigger action or profile, see Managing Triggers.
Have more questions? Submit a request
Please sign in to leave a comment.

0 Comments