Configure Table Actions
(maybe delete this first section?)
Bootstrap Data Table
The following settings are available on the Bootstrap theme only:
| Property | Description |
|---|---|
| Include Quick Search | Include a search bar that allows for quick searching of all columns in the table. |
| Compact Display | Displays a compact table with smaller fonts and less padding. |
| Allow Change Length | Include a drop down and allows the user to change the number of records displayed on each page. |
| Hide Table Controls on Mobile |
Hide the page length menu, quick search, and any category filters when viewed on a mobile device for a cleaner interface. |
| Responsive Table | The table will automatically adjust by hiding rows from right to left to fit the viewport |
| Nest Responsive Cols | When the Responsive Table setting is enabled, setting this to true will nest columns that do not fit in the viewport into an expandable section below each row. |
| Multi Select | Set this to true to allow multiple rows of the table to be selected using the SHIFT and CTRL keys. Use this in conjunction with the Table Tools option to delete multiple rows or run a trigger on multiple records. |
| Include Table Tools | Include tools above the table with options to delete selected rows, export data, and other operations that work on a set of selected rows. |
Table Tools, when enabled, will display actions above your data table and by default include a Select All and a Deselect All option. Table Tools are used to operate on a set of selected records and make selecting all of the rows easier. Table Tools support the following options:
- Delete Selected
- Export Records
- Execute a Trigger Action on selected records
- Bulk Update
The options selected are displayed in a drop down menu above the table.
Configuring Table Tools
-
Enable Table Tools by setting Include Table Tools to true in the Layout Settings panel.
-
Click the Table Tools Actions button to open the wizard.

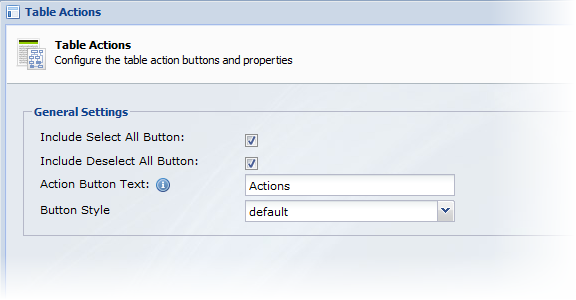
In the wizard, configure the General Settings and click Next to add the actions that will be displayed in the actions drop down:

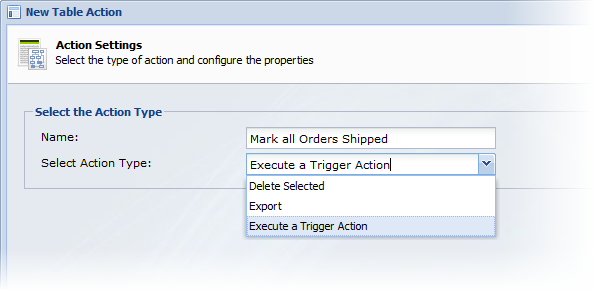
Select from one of the 4 actions Delete Selected, Export, Execute a Trigger Action, or Bulk Update, and configure the settings for each.
Delete Selected
Delete the selected records. See the Delete Settings from the Row Action Widget.
On the Delete Settings screen, make your selections:
| Field | Details |
|---|---|
| Button Label | Default is Delete Selected; overwrite to change |
| Delete Prompt Title | Default is Confirm Delete; overwrite to change |
| Delete Prompt Message | Default is "Are you sure you want to delete the selected records?; modify as necessary |
| Post Delete Custom JS | Optional; enter a custom Javascript routine to run after the record is deleted |
Then on the Refresh Settings screen, make additional selections before clicking Finish.
| Field | Details |
|---|---|
| Refresh Data Table Only | Default is true; the data table/records are reloaded only. This is the best option when you are updating a row of data via an edit page, trigger, or deleting recors |
| Refresh Entire Page | Default is false; change to true if you want to reload the entire page |
| Advanced Refresh Settings | Optional |
| Show Inline Message | Default is false; show feedback to the user when the window is closed |
Export
Configure which columns to export.
In the Settings window, choose which columns to export then click Finish. All rows are exported, but only the columns selected.
Execute a Trigger Action
Run a trigger on the selected set of records. Use this option to automatically update the values of a record, send an email to multiple people, transfer records to an alternate table, trigger a 3rd party integration and more. See the trigger settings from the Row Action Widget.
On the Settings window, configure your action and click Next.
| Field | Details |
|---|---|
| Button Label | Default is Button Text; overwrite to modify |
| Confirm Prompt Title | Default is Confirm |
| Confirm Prompt Message | Enter your text; suggested message is Are you sure you want to run this trigger? |
| Redirect to URL post Execution | Optional |
| Obey Initial & Change State Rules | Check to set to true |
| Run Specified Trigger Actions Only | Check to set to true |
| Skip Trigger Action Rule Evaluation | Check to set to true |
| Remove Record post Execution | Check to set to true |
| Bulk Update | Click the Update Record Values button to configure bulk updates |
| Post Trigger Custom JS |
Optional; enter a custom Javascript routine to run after trigger is executed |
Select a trigger, which you have already set up, and click Next.
Then on the Refresh Settings screen, make additional selections before clicking Finish.
Bulk Update
Define your changes and then click Next.
| Field | Details |
|---|---|
| Button Label | Default is Bulk Update; overwrite to change |
| FormView or Primary View | Select from the dropdown list; form views are different views of your form created in the Form Designer |
| Update Blank Fields | Default is false; only fields that are not blank will be updated; change to true if you want to update all fields on the form including blank ones |
| Static Params |
Click Static Params to open the window where you then click Add New Field/Row, then select a target field, and in the right hand column enter the value you want entered; repeat as necessary the click Save. |
Define the display on the Lightbox/Modal Settings window and click Next.
Then on the Refresh Settings screen, make additional selections before clicking Finish.

0 Comments