Populating a PDF Form
If you've got an existing PDF form, you can populate it with the data from a web form submission using a PDF Form population template. For each form submission received, a populated PDF form is created which can be attached to outgoing emails, saved for use later or sent for signature.
PDFs are created and managed using the PDF Wizard. In the Form Designer, from the Post Processing menu, choose PDF Generation.
On This Page
Creating a Template
Before you begin, be sure you have created a PDF form with fields. This is typically done with a program like Adobe Acrobat or Adobe XI.
-
In the PDF Population Templates window, click Create New Template. Or if you have already created one or more profiles, click the Create New Template menu item.
-
Note the description of this wizard and click Next. The selection page appears listing four choices.
-
Choose PDF Form and click Next to move forward in the wizard.
PDF Form Settings
-
Enter a meaningful name for this profile.
-
In "the Generated PDF filename" field enter the name of the PDF that will be generated. Click the wildcard icon to insert one of the fields from your form in the file name. For example, if you are going to send this PDF to a customer, you might want to include their last name or their order number in the file name.
-
If needed, click the Edit Rule button to configure the Execution Rule using the standard Logiforms Rules screen. This rule determines if the PDF document will be generated.
-
In the Upload PDF Form field, click Browse and select the PDF form that you want to upload.
To work correctly with your form, the PDF file that you upload must be a form containing interactive input fields. You can add these interactive fields to a static form using Adobe Acrobat products. If no such form fields are found, an error message displays and you cannot proceed to the next screen. -
Check the Flatten PDF field. This is the default and the recommended setting. Flattening a PDF simplifies the document so that it is no longer interactive. It also makes it render more quickly. If you do not check this field, many PDF plugins for browsers and preview extensions for mail programs will not render the form field values, so your PDF may look empty to some users.
-
Click Next to move to PDF Document Settings. The message "Importing your PDF form. Please wait." displays as your PDF is uploaded.
Field Naming Errors
Within your uploaded PDF, fieldnames can not being with a number and can not contain any punctuation (!,@,#. etc). If the fieldnames are invalid, you will receive an error here. If that happens, please rename the offending fields (in Adobe XI), or send the PDF to our support team for assistance.PDF Document Settings
-
The default for Update Option is false. Change to true if you want to regenerate the PDF each time the record is updated.
-
In the New PDF Field Name, enter a name for the hidden field on your form that will be created to contain the filename of the PDF. This field will hold a refernce to the generated PDF filename. Or if you have already created a hidden field to hold the PDF, choose Use Existing PDF Field and choose it from the dropdown list that appears.
-
If you wish to include Lookup Data in your PDF from one or more alternate forms, select the Include Alternate Lookup Data checkbox. See Using Lookup Data for details on configuring and managing Lookup Data sources.
-
Click Next to move to Security & Permissions.
Using a Shared Destination PDF Field
You can create multiple PDF Population templates, each with a unique rule, and the same destination field. For example, you might generate a different PDF depending on the type of event a user is registering for. Based on the rule evaluation only one of the PDFs will be generated and its file name written to the PDF form field.Security and Permissions
-
If you need to restrict access to the attachments folder where generated PDF documents are stored, check Secure PDF Attachment Directory. If you apply this security option, you can not include a link to the PDF in the body of an email because the directory will no longer be web accessible. You can, however, still attach PDFs to your autoresponder and notification emails.
-
To secure the file itself, in the PDF Encryption field, choose 128-bit.
-
If you choose 128-bit Encryption, you must specify an Owner Password and a User Password, and choose which Permissions you want to enable for the file. Note that you can use a wildcard value as the user password to create a password unique for each form submission.
-
Click Next and move to Field Mappings.

Field Mappings
This is where the rubber hits the road. In this window you map the source fields from your web form to fthe fields in your PDF Population template. Click in the Source column and choose a field from the dropdown list whose content should be mapped to the field listed across from it in the Destination column.
-
Repeat for each field that you want to map.
-
Click Finish to commit the changes. In a moment, the new template appears in the PDF Population Templates management window.
Using Uploaded Images & Inline Signatures
Uploaded images and inline signatures can be mapped to any standard textfield on your PDF. There are two important things to keep in mind when doing this:
- PDF's will be automatically flattened when images are used
- The image will be placed where the textfield is and take up the same amount of space. Draw a large textarea in the PDF where you want the image to go for best results
Field Mapping Tips
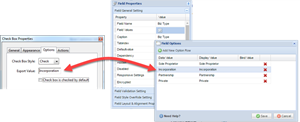
- When mapping multi-choice questions (Radio Buttons, Checkboxes and Drop Downs), the Field Value in Logiforms must match exactly the Export Value in the PDF. This mapping is case sensitive. For example,
- Always map checkboxes to checkboxes and radio buttons to radio buttons etc. This is not a requirement but does simplify the mapping
- Naming the fields on your web form the same as the fields in your PDF, will save lots of time as the fields will be automatically mapped for you
- Image Fields and Inline Signature Fields can be mapped to any textfield on the PDF. Note, that the size of the textfield will be used to size the image (typically you will enlarge the textfields on the PDF to show an image.
- Signature field types in the PDF are not supported. If you need electronic signatures, you can map an inline signature element to a textfield as explained above or use our Adobe Sign Integration.
Advanced: Mapping Lookup Data and Repeating Rows
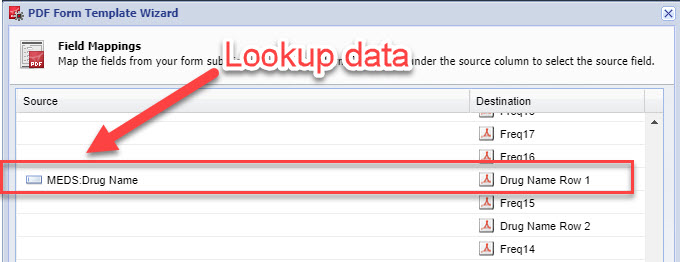
ENTERPRISE PLUS - ADD ONIf you selected the Include Alternate Lookup Data option, the left hand column of the data mapping grid will display all of the fields from the linked forms prefixed with the lookup name. These fields can be mapped directly to any of the fields on your PDF.
To map repeating data to a PDF (For example, SubForm data), the fields on the PDF must end with a sequence number starting with "1", (ie. Account1, Account2,Account3...).

In the field remapping window, you only need to map the first row of fields ending in "1", and the multiple rows of lookup data will automatically be populated into the sequentially numbered fields on the PDF.


0 Comments