Auto-login to edit in an embedded frame
This article explains how to set up the integration code required to use the embedded integration method (masking our URL), in combination with the auto-login-to-edit technique, which, using the unique LFUUID associated with each record, allows an end user to edit a previous submission without having to log-in.
Background
The auto-login-to-edit technique involves generating the URL to login by using the Integration Wizard's 'Direct Edit Link' as shown below:

There is however, no option to generate a Direct Edit Link within the embedded integration code. This article explains how to you can combine these techniques.
Generating the Embed Code Part 1
In order to generate the embed code used to EDIT records, we're going to start by adding a username and password field to a form (we'll remove this field once were done). By adding the username & password field from the special fields library, the integration wizard will give us the option of generating the respondent update mode embed code. This code will form the basis of our setup.
- Add the username and password field to your form.
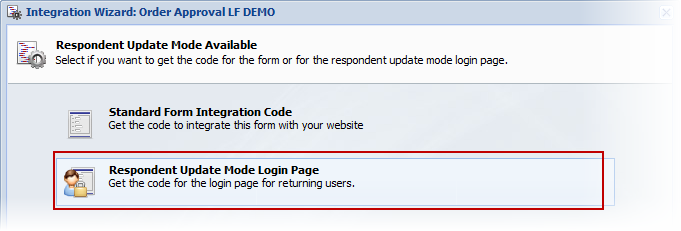
- Open the Integration Wizard and choose the Respondent Update Mode Login Page option.

- Leave all the defaults and click next 4 more times until the code is presented. Copy this code to a text editor (e.g notepad) so tyou can edit it.
You should now have the login page code that looks like this:
Hint
This code is an example only, the ID's in this code will not match your code (thats normal)
<script type="text/javascript">
var formscript = ((document.location.protocol == 'https:')?"https://" : "http://") + 'forms.logiforms.com/v3/build/ext/formProxy-min.js';
document.write(unescape("%3Cscript src='" + formscript + "' type='text/javascript'%3E%3C/script%3E"));
</script>
<script type="text/javascript">
FormProxy = new FormProxy({
  // user editable
  resizeOnDemand        : true,
  scrollTop           : true,
  height                : 500,
  width                : '100%',
  scrolling            : 'no',
  marginWidth            : 0,
  marginHeight        : 0,
  frameborder            : 0,
  vspace                : 2,
  hspace                : 2,
  params                : '',
  // system properties
  formviewid          : 0,
  hid                    : 347238,
  fid                    : 75839,
  eid                    : 54339,
  eid2                : 44,
  secureform            : 0,
  rootformurl            : 'https://forms.logiforms.com/',
  mode                : 'respondentupdate'
});
</script>
At this point, we can remove the username and password field from the form (unless you prefer to keep them). Next, lets update our integration code to tell the script that we want to by-pass the login and go directly to editing the record.
In the code you have copied to notepad, find this line:
params : ''
And update it to the line below:
params : 'formtype=litelogin&requestmode=prompt'
By doing this, we are telling the loader that we want to force the login.
If we wanted to provide access to only a single record, we could provide the LFUUID of that record here in the params option aswell:
Be Careful when embedding the LFUUID in the source code
This next step, when the LFUUID is embedded into the params option, should be used with caution as it exposes the record to be edited by anyone. It also make this implementation only work for a single record.params : 'formtype=litelogin&requestmode=prompt&lfuuid=be70a323-09e3-4478-ac88-63d5aa97d11d'
But in most cases, we'll want to pass the LFUUID to the parent page (the page where you embed your form) so that it can get automatically passed through into the frame. In this way, you can allow multiple records to be edited by calling the parent page with a different LFUUID in the URL.
For Example, if you embed this code on your website at http://www.yourwebsite.com/myform.html, you could supply your end user with a URL like the one below to allow them to pull up a record with the matching LFUUID:
http://www.yourwebsite.com/myform.html?lfuuid=be70a323-09e3-4478-ac88-63d5aa97d11d
The lfuuid portion gets passed through to the embedded form and pulls up the record so that it can be edited without any login.

0 Comments